Hacking the GameCube controller on the Raspberry Pi
Inspiration
So I got a Raspberry Pi for Christmas (thanks Secret Santa!), and I decided that I wanted to create a little retro gaming appliance with it.
First thing I did was install the NOOBS software that is recommended for first time Raspberry Pi users.
Next I googled for gaming emulators on Raspberry Pi. After grokking several forum and blog posts, I came across the RetroPie project (http://blog.petrockblock.com/retropie/). This certainly looked promising.
After going through the RetroPie-Setup scripts - I thought that I was almost home. So I started up emulationstation - a graphical frontend for all of the emulators. Once I did the obligatory startup of Super Mario Bros - I was sorta happy. However, I thought - keyboard controls suck. I want a game controller.
Being kinda cheap, I said to myself - “hey…my son has a bunch of game stuff up stairs…” - after digging though his gear, I found a nice GameCube controller.
I Googled for “GameCube controller raspberry pi” - which led me to this article.
Installing the gamecon_gpio_pri
I dug in a bit deeper and looked at how I would wire up this controller. This site describes the interface for the Revision 1 Raspberry Pi board. However, I needed a wiring diagram for the Gamecube controller so that I could hook it up.
This site had a nice description of the pins -
I was super excited at this point and figured I was 90% of the way there!
I wired up Pin 2 of the GC controller to GPIO 2 on the Raspberry Pi. I also tied Pins 3, 4 and 7 together and wired them to Ground on the Raspberry Pi. Finally, I hooked up the controller’s Pin 6 to VCC+ which is Pin 1 on the Pi. I used this site for reference.
So once I had the GameCube controller wired up, it was time to load the driver. After some experimentation, I figured out the command to load the driver for GPIO2:
sudo modprobe gamecon_gpio_rpi map=0,0,0,0,3,0
The modprobe command is a Linux command to load and unload kernel modules. The map parameter is described in the source code:
module_param_array_named(map, gc_cfg.args, int, &(gc_cfg.nargs), 0);
MODULE_PARM_DESC(map, "Describes the set of pad connections (<GPIO0>,<GPIO1>,<GPIO4>,<GPIO7>,<GPIO2>,<GPIO3>)");
I also added this command to /etc/modules so it would be loaded at startup time:
sudo vi /etc/modules
There is a program for testing gamecontrollers hooked up called jstest - I ran it like this:
pi@raspberrypi /usr/src/gamecon_gpio_rpi-0.9.1 $ jstest /dev/input/js1
Driver version is 2.1.0.
Joystick (Gamecube controller) has 8 axes (X, Y, Rx, Ry, Gas, Brake, Hat0X, Hat0Y)
and 8 buttons (BtnX, BtnY, BtnTL, BtnTR, BtnTL2, BtnTR2, BtnSelect, BtnThumbR).
Testing ... (interrupt to exit)
Axes:  0:-32767  1: -1066  2:  1065  3: -1865  4:-32767  5:-24776  6:     0  7:     0 Buttons:  0:off  1:off  2:off  3:off  4:off  5:off  6:off  7:off
I clicked a couple of buttons, moved around the joysticks, and saw that the values were changing. So I figured I was done with the controller setup.
After removing ~/.emulationstation/es_input.cfg (this causes emulationstation to run the input setup again) - I noticed some strange things:
- When the program asked me to press “Up” - It would jump 2 or 3 steps through the process after I pressed up.
- After 2-3 times of running the setup (carefully timing my “Ups” and “Downs”) - I tried playing a game
- The game was not responsive and didn’t seem like the controller was working correctly.
So I went back to google and started doing more research. Unfortunately - there wasn’t much information available. Nobody seemed to be having my problem, but there also wasn’t much discussion anywhere regarding the GameCube controller and the Raspberry Pi. I posted a question on the raspberry pi forums about this just to see if I would get a response. But being impatient…I wasn’t going to wait for the answer.
Hacking on the code
After digging around the file system on the Raspberry Pi a bit, I was able to find the source code for the gamecon_gpio_rpi kernel extension. It doesn’t appear to live in github or any other source code repository. Although there is a deb package that includes the source. If you’ve installed the driver with the RetroPie-Setup script, the source lives here:
/usr/src/gamecon_gpio_rpi-0.9
It is managed with dkms - so hacking on it is relatively straightforward. So I started digging in a bit to the source.
After looking through the source a bit, the first thing that seemed incorrect was this:
#define GC_GCUBE_REQUEST 0x40c002U /* the request data command */
The reason this seemed incorrect, is that there were a few articles written by other folks regarding the gamecube controller protocol. The consensus was that the command should be:
#define GC_GCUBE_REQUEST 0x400302U /* the request data command */
So I figured I’d start there and see where that got me. I copied the whole src as follows:
sudo cp /usr/src/gamecon_gpio_rpi-0.9 /usr/src/gamecon_gpio_rpi-0.9.1
I removed the existing module using dkms:
sudo dkms remove gamecon_gpio_rpi/0.9 --all
I setup a little rebuild script:
#!/bin/bash
sudo modprobe -r gamecon_gpio_rpi
sudo dkms remove gamecon_gpio_rpi/0.9.1 --all
sudo dkms install gamecon_gpio_rpi/0.9.1
sudo modprobe gamecon_gpio_rpi map=0,0,0,0,3,0
And I tried my change to the GC_GCUBE_REQUEST hoping that it would solve all my problems.
After rebuilding and loading the module I ran the jstest program again. It seemed to be working a bit better, but it still wasn’t as responsive as one would expect a controller to be.
I was honestly a bit stumped at this point. I double checked all my connections and couldn’t find any problems.
So I went ahead and brought out my trusty oscilloscope. Based on the description of the gamecube controller protocol from other articles - I expected to see a 24 bit message (23 + stop bit) containing the following:
1000 0000 0000 0110 0000 010 1
So here was the capture from my scope.
After annotating it with 0s and 1s:

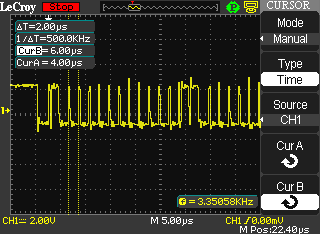
So after looking at that - it looked pretty close. And given the fact that I was receiving controller information, I figured it was probably correct. However, I figured I needed to do a little more analysis. First, I measured the timing of the 0s and 1s of the response from the controller. I captured a successful 64 bit message returned from the controller and measured the time of single bit:
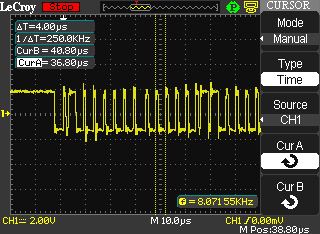
It measured at 4us - which matched what other articles I found while doing research. If the response was 4us per bit - then the command sent from the gamecon_gpio_rpi driver should match. So I measured the command signal from the Pi:
Doh! It measured at 2us. That doesn’t seem right…so I dug into the code that sends the command over the gpio pins:
    /* Send encoded command */
    static inline void gc_n64_send_command(struct gc_nin_gpio *ningpio)
    {
       int i;

       /* set correct GPIOs to outputs */

       *gpio &= ~ningpio->cmd_setinputs;
       *gpio |= ningpio->cmd_setoutputs;

       /* transmit a data request to pads */
       for (i = 0; i < ningpio->request_len; i++) {
            if ((unsigned)((ningpio->request >> i) & 1) == 0) {
                 GPIO_CLR = ningpio->valid_bits;
                 udelay(3);
                 GPIO_SET = ningpio->valid_bits;
                 udelay(1);
            } else {
                 GPIO_CLR = ningpio->valid_bits;
                 udelay(1);
                 GPIO_SET = ningpio->valid_bits;
                 udelay(3);
            }
       }
We can see here that the code is correct if udelay is calibrated at 1us (1 microsecond). This code appears to be correct because there is a 3us pull low followed by a 1us pull high for a 0 bit. And there is a 1us pull low followed by a 3us pull high for a 1 bit. However, the scope indicated that the delays weren’t matching.
So I decided I would fiddle with those values a bit to see if I could get the command to match up with a 4us duration per bit. After some trial and error here was the code I arrived to:
/* Send encoded command */
static inline void gc_n64_send_command(struct gc_nin_gpio *ningpio)
{
   int i;

   /* set correct GPIOs to outputs */
   *gpio &= ~ningpio->cmd_setinputs;
   *gpio |= ningpio->cmd_setoutputs;

   /* transmit a data request to pads \*/
   for (i = 0; i < ningpio->request_len; i++) {
        if ((unsigned)((ningpio->request >> i) & 1) == 0) {
             GPIO_CLR = ningpio->valid_bits;
             udelay(4);
             GPIO_SET = ningpio->valid_bits;
             udelay(2);
        } else {
             GPIO_CLR = ningpio->valid_bits;
             udelay(2);
             GPIO_SET = ningpio->valid_bits;
             udelay(4);
        }
   }
At a glance this didn’t make a lot of sense because the values aren’t clean multiples. I don’t have a good explanation for this at the moment.
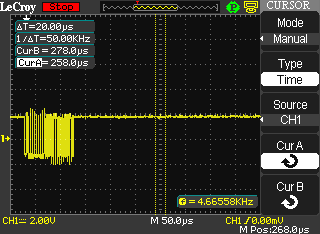
But the capture from the scope showed that I had achieved a 4us duration for the command duration per bit:
So I ran the jstest - and all seemed to be working properly - the updates to the joystick and button data seemed to be good. However, there was something strange happening on the scope.
It seemed that the response was intermittent. It would rapidly jump between these 2 states:
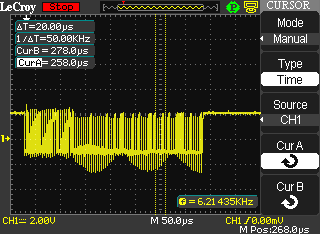
I felt that it should not be jumping back and forth between having a response sometimes and not having a response other times. So I took another look at the code that sends the response and noticed this:
    /* send stop bit (let pull-up handle the last 2us) \*/
    GPIO_CLR = ningpio->valid_bits;
    udelay(1);
    GPIO_SET = ningpio->valid_bits;
So based on my previous change to the other timing, I changed that code to this:
    /* send stop bit (let pull-up handle the last 2us) \*/
    GPIO_CLR = ningpio->valid_bits;
    udelay(2);
    GPIO_SET = ningpio->valid_bits;
After rebuilding the module one more time, it appeared to stabilize the signal so that I saw a nice constant wave form that wasn’t intermittently receiving responses - but rather receiving responses every time a command is sent.
Conclusion
I suspect that the timing of the udelay has changed with various changes to the raspberry pi and/or Linux kernel. It appears that udelay supports resolution of about 500ns (.5us) based on my experimentation. However, this might change from version to version - or worse - it might change based on the load of the system. So I will have to do further testing with actual gameplay to see if this is going to work long term or not. Unfortunately - the raspberry pi running Linux is NOT a realtime OS.